Sub-tasks are those actions which comprise a part of the project activities. Normally, we create an activity and then assign it a series of sub-tasks which will help us control the quality and progress of this activity.
Additionally, another of its chief functions is to give the project flexibility. While the project is ongoing, small unplanned actions may arise. If we add sub-tasks into the activities, we can edit, eliminate or add new ones without affecting the whole work path in our planning.
Every activity in Sinnaps may contain all the sub-tasks you deem necessary, in the order you want and with the name that best defines them. Using them also simplifies the planning and facilitates communication with the team.
We’ll tell you about a few common examples where sub-tasks can be created in your activities, with the intention of being more productive and having real-time control over the operations of your project.
How and when should I add sub-tasks?
Each project is planned according to its nature and requirements. Sub-tasks tend to be a common element in all of them. So, we’ll give you some examples so you know how to use this basic feature of Sinnaps.
- Same people, same dates, same dependencies. Include sub-tasks when you have activities in which the people assigned as the same as for others and take place at the same time. Equally, include sub-tasks when the links with the activity are also the same. This way you’ll simplify your planning and communication with the whole team.
- Assign sub-tasks to everyone. You can put the name of the person and action to be accomplished in the title of the sub-task. For example: ‘Pedro: design draft’. When Pedro has the draft ready, he can attach it to the activity and validate his sub-task. This is of primary usefulness for communicating directly with the team.
- Don’t skip any steps. Divide the activity into blocks and remember everything that needs to be done in order to validate it. Don’t forget any steps or ingredients.
- Check list. The sub-tasks act as a simple task manager. They are a list of actions you can validate as they are concluded. It’s very practical to include all the little actions in a particular strategy.
- Deliverables list. There are activities which require various documents to be created. These will be added to the activity and validated on the sub-task list.
- Support tool list. The Project Manager or person responsible for the activity may make a list of the external apps or tools required to validate the activity. They will serve as a support and each sub-task can be validated so everyone knows the tool has been used.
These are just a few tricks or examples of how to use sub-tasks practically in order to simplify and better organise our planning. Using them, we control the implementation of the activities and can be more flexible when planning. Once they are ready, you might well be meeting some of the objectives of the activity.
Now we’ll tell you how you can do this from your app!
How can I create sub-tasks in Sinnaps?
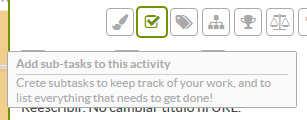
Create sub-tasks for an activity by accessing the activity panel and clicking on it. Once in, click on the following icon.
A sub-task is automatically added to our activity. It’s that simple! All you need to do now is give it a name. By clicking on ‘Enter’, you can create another sub-task.
When we’ve completed the sub-task, we can validate it by clicking on the tick that is to the left.

In order to eliminate a sub-task, just click on the Trash icon and it will disappear directly from the activity.
Additionally, remember you can move the sub-tasks and place them where you want using the arrows. It’s that easy and flexible!

